Battery switch on travel trailer function is crucial for managing your RV’s power. Understanding how your battery switch works—whether it’s a simple 1-2-both or a more complex setup—is key to preventing electrical issues and maximizing your battery life. This guide will walk you through the different types of switches, their functions, troubleshooting tips, and important safety precautions to keep your travel trailer running smoothly.
We’ll cover everything from basic wiring diagrams to advanced troubleshooting techniques, ensuring you have the knowledge to handle any battery-related problem on the road. Get ready to become a power management pro!
Function and Purpose of the Battery Switch
The battery switch in your travel trailer is a crucial component for managing power flow between your trailer’s house battery (which powers your interior lights, appliances, and other 12V systems) and your tow vehicle’s battery. It allows you to control which battery is providing power to the trailer and how charging is handled. Understanding its function is key to safely and effectively using your RV.This switch acts as a gatekeeper, selectively connecting or disconnecting the house battery from the vehicle battery.
This control is vital for preventing unwanted battery drain and ensuring proper charging. The switch usually offers several positions, allowing you to completely isolate both batteries, connect only the house battery, connect only the vehicle battery, or connect both in parallel for charging or combined power needs.
Battery Charging and Discharging
The battery switch facilitates both charging and discharging processes. When connected in parallel, the vehicle’s alternator can charge the house battery while the vehicle is running. This is the most common method for charging the house battery. Conversely, when the vehicle is disconnected, the house battery powers the trailer’s systems. The switch prevents the house battery from draining the vehicle’s battery when the trailer is not connected to the vehicle.
Using the switch correctly ensures efficient charging and prevents accidental depletion of either battery.
Safety Implications of Improper Battery Switch Usage
Improper use of the battery switch can lead to several safety hazards. Leaving the switch in the “both” position when the vehicle is not connected can completely drain the vehicle’s battery, leaving you stranded. Conversely, if you try to use high-power appliances while only the house battery is connected, it could lead to overloading and damage to the battery or even a fire.
Understanding the different positions and their implications is critical for preventing these problems. Always consult your RV’s manual for specific instructions regarding your battery switch model. Furthermore, regularly checking the battery levels and ensuring proper connections are maintained is a crucial part of safe RV operation.
So, you’re planning a trip? Awesome! First things first: get yourself sorted with travel insurance. Check out Aon travel insurance for solid coverage. Then, if you’re an audiophile like me, don’t forget your tunes! Setting up your audiophile travel setup beforehand is key for a truly enjoyable journey. Proper planning ensures a smooth and awesome vacation!
Troubleshooting Common Battery Switch Issues
Your travel trailer’s battery switch is a crucial component, ensuring you have power when you need it. Problems with this switch can leave you stranded without lights, refrigeration, or other essential systems. Understanding common issues and how to troubleshoot them is vital for a smooth camping experience.
Troubleshooting a malfunctioning battery switch often involves a systematic approach, checking connections and the switch itself. Remember safety first – always disconnect the negative battery terminal before working on any electrical components.
No Power to the Trailer
This is the most frustrating issue. It means your appliances aren’t working, and you’re likely dealing with a problem either in the switch itself, the wiring, or the batteries. A methodical approach is key to identifying the culprit.
- Check the Battery Switch Position: Ensure the switch is correctly positioned to supply power to the trailer. Sometimes, a simple accidental shift can cause this problem.
- Inspect the Battery Connections: Look for loose or corroded connections at both the battery and the switch. Clean any corrosion with a wire brush and baking soda solution, and tighten any loose connections.
- Test the Battery Voltage: Use a multimeter to check the voltage of your batteries. A low voltage reading indicates the batteries need charging or replacement.
- Check the Switch Itself: If the connections are good and the batteries are charged, the switch itself might be faulty. A visual inspection for damage is a good starting point. You may need to replace the switch if you find any signs of damage or if testing reveals a problem in the switch’s internal mechanism.
- Examine the Wiring: Look for any breaks, cuts, or loose connections in the wiring running from the battery to the switch and from the switch to the trailer. A visual inspection can often pinpoint a problem. If the wiring appears damaged, repair or replace it as needed.
Inconsistent Power
Intermittent power can be equally problematic, causing unexpected failures of appliances. This suggests a more subtle issue, often related to loose connections or a partially functioning switch.
- Check for Loose Connections: Repeatedly tighten all connections at the battery, the switch, and anywhere along the wiring harness. Vibrations during travel can loosen connections over time.
- Inspect the Switch for Wear and Tear: Examine the switch closely for any signs of wear, damage, or corrosion. A worn-out switch might not always make a reliable connection.
- Test the Wiring for Continuity: Use a multimeter to test the continuity of the wiring between the battery, the switch, and the trailer’s electrical system. A break in the circuit will show a lack of continuity.
- Consider Corrosion: Even a small amount of corrosion can cause inconsistent power. Clean all connections thoroughly.
Preventing Future Problems, Battery switch on travel trailer function
Regular maintenance is key to avoiding battery switch issues. A little preventative care can save you a lot of headaches down the road.
- Regular Inspection: Visually inspect the battery connections and the switch itself at least once a year or before each camping trip.
- Clean Connections: Clean battery terminals and switch connections with a wire brush and baking soda solution to remove corrosion.
- Tighten Connections: Regularly tighten all connections to ensure a secure and reliable electrical connection.
- Proper Storage: When not in use, store your travel trailer in a dry place to prevent corrosion.
- Use Battery Protectant: Applying a battery terminal protectant can help prevent corrosion.
Wiring Diagrams and Schematics: Battery Switch On Travel Trailer Function
Understanding your travel trailer’s electrical system is crucial for safe and reliable operation. Wiring diagrams provide a visual representation of how different components connect, making troubleshooting and maintenance much easier. Let’s look at a couple of examples, starting with a simplified setup and then moving to a more complex system.
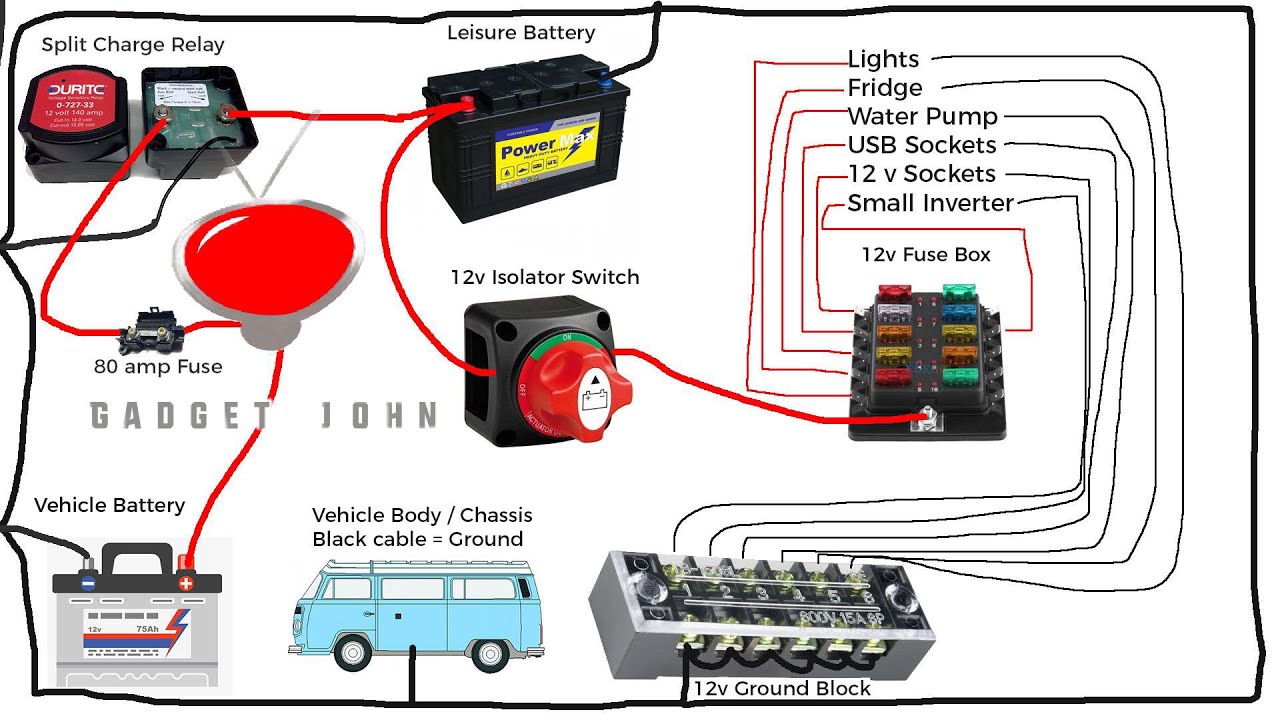
Simplified Wiring Diagram: Battery Switch, House Battery, and Vehicle Battery
This diagram shows the basic connection between your battery switch, your house battery (used for powering appliances inside the trailer), and your vehicle battery (used to start your tow vehicle and charge the house battery). It’s a good starting point for understanding the fundamental operation.
| Component | Description | Connection |
|---|---|---|
| Vehicle Battery | Provides power to start the tow vehicle and charge the house battery. | Connected to the battery switch via a heavy-gauge wire. |
| Battery Switch | Controls the flow of power between the vehicle battery and the house battery. Usually has positions for “Off,” “Vehicle,” “Both,” and “House.” | Connects to both the vehicle battery and the house battery. |
| House Battery | Powers the appliances and lights inside the travel trailer. | Connected to the battery switch and the trailer’s electrical system. |
| Trailer Electrical System | Includes lights, appliances, and other electrical devices within the trailer. | Connected to the house battery. |
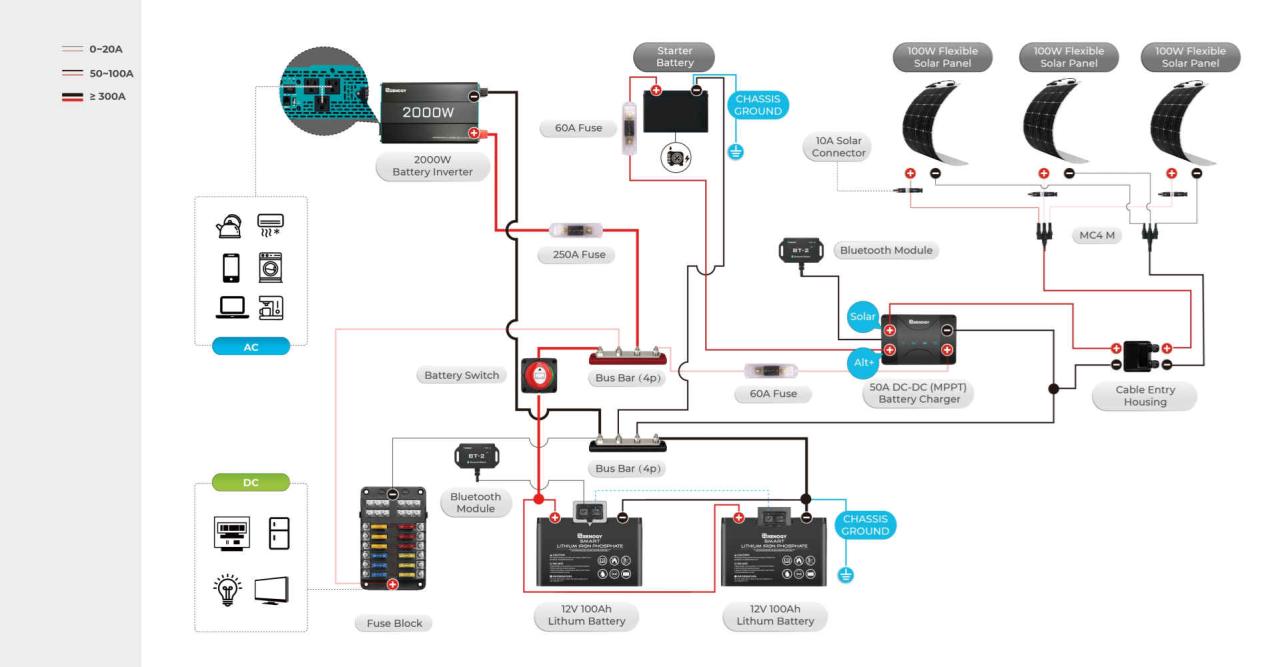
Complex Wiring Diagram: Including a Solar Panel Charging System
This diagram expands on the previous one by incorporating a solar panel charging system. This system allows you to charge your house battery using solar energy, extending your off-grid capabilities. Note that additional components like a charge controller are necessary to regulate the voltage and prevent overcharging.
| Component | Description | Connection |
|---|---|---|
| Solar Panels | Convert sunlight into DC electricity. | Connected to a solar charge controller. |
| Solar Charge Controller | Regulates the voltage and current from the solar panels to prevent overcharging the battery. | Connected to the solar panels and the house battery. |
| Vehicle Battery | Provides power to start the tow vehicle and charge the house battery. | Connected to the battery switch via a heavy-gauge wire. |
| Battery Switch | Controls the flow of power between the vehicle battery, house battery, and solar charging system. | Connects to both the vehicle battery and the house battery. |
| House Battery | Powers the appliances and lights inside the travel trailer. | Connected to the battery switch, the trailer’s electrical system, and the solar charge controller. |
| Trailer Electrical System | Includes lights, appliances, and other electrical devices within the trailer. | Connected to the house battery. |
Battery Switch Maintenance and Replacement
Keeping your travel trailer’s battery switch in good working order is crucial for reliable power. Regular maintenance prevents problems and extends the life of the switch, ensuring you always have power when you need it. Neglecting maintenance can lead to corrosion, poor connections, and ultimately, failure of the switch.Regular inspection and cleaning are key to preventing problems. A faulty switch can leave you stranded without power, making routine maintenance a worthwhile investment in your peace of mind.
So, you’re planning a trip? Awesome! First things first: get yourself sorted with travel insurance. Check out Aon travel insurance for solid coverage. Then, if you’re an audiophile like me, don’t forget your tunes! Planning your audiophile travel setup beforehand is key for enjoying those amazing landscapes with your favorite music. Make sure you pack accordingly and have a blast!
Routine Battery Switch Maintenance
A simple maintenance schedule can significantly extend the lifespan of your battery switch. This involves both visual inspection and cleaning.
- Visual Inspection (Monthly): Check the switch for any signs of corrosion, loose connections, or physical damage. Look closely at the terminals and the switch housing itself. Pay attention to any discoloration or buildup of white, green, or powdery substances, which indicate corrosion.
- Cleaning (Every 3 Months): Use a wire brush or a battery terminal cleaner to remove any corrosion from the terminals and the switch housing. A solution of baking soda and water can also be effective in neutralizing acid buildup. After cleaning, apply a thin layer of dielectric grease to the terminals to prevent future corrosion and improve conductivity. This grease helps repel moisture and contaminants.
- Tightening Connections (Annually): Check that all connections are securely fastened. Use a wrench to tighten any loose bolts or nuts. Over-tightening can damage the terminals, so tighten them just until they are snug.
Replacing a Faulty Battery Switch
If your battery switch fails despite regular maintenance, replacement is necessary. This is a relatively straightforward process, but always disconnect the battery’s negative terminal before starting any work to avoid electrical shock.
- Disconnect the Battery: Disconnect the negative (-) terminal of your trailer battery. This is crucial for safety.
- Remove the Old Switch: Locate the battery switch. Usually, it’s easily accessible near the battery. Unscrew or unbolt the switch from its mounting bracket. Take photos or make notes of the wiring connections before disconnecting anything.
- Note Wiring Connections: Carefully disconnect all wires from the old switch. Note the position of each wire – color-coding helps. A diagram is useful if you have one. If not, carefully record where each wire was connected.
- Install the New Switch: Mount the new switch in the same location as the old one, ensuring it’s securely fastened.
- Reconnect the Wires: Connect the wires to the new switch, matching them exactly to the positions noted earlier. Double-check your work before proceeding.
- Reconnect the Battery: Reconnect the negative (-) terminal of the battery. Test the switch to ensure it functions correctly.
Proper Disposal of Old Battery Switches
Old battery switches should be disposed of responsibly. Do not simply throw them in the trash. Check with your local waste management facility or recycling center for the proper disposal method. Many facilities accept small electrical components for recycling. Improper disposal can harm the environment, so proper recycling is essential.
Impact of Battery Switch on Travel Trailer Systems
The battery switch is the central control point for your travel trailer’s power, significantly influencing the functionality of various systems and the overall efficiency of your power management. Understanding its impact is key to maximizing your off-grid experience and extending the lifespan of your batteries.The battery switch acts as a gatekeeper, determining which power source feeds your trailer’s systems – your onboard batteries or shore power.
When the switch is in the “off” position, all circuits are disconnected, preventing accidental drain and protecting your battery. In the “battery” position, only your house batteries power the trailer. The “both” or “combined” position allows both shore power and your house batteries to power the trailer, usually with shore power acting as the primary source and batteries providing backup or supplemental power during periods of high demand or shore power outages.
This setup directly affects how your lights, appliances, and water pump operate.
Battery Switch Influence on Travel Trailer System Functionality
With the battery switch in the “battery” position, only the power stored in your house batteries is available. This means that if your batteries are low, systems like your lights, water pump, and refrigerator (depending on its type) will either operate at reduced capacity or shut down entirely. The “both” position, however, allows for continuous operation of these systems, even if the batteries are discharging, as long as shore power is connected.
For example, if your water pump is running while connected to shore power and the battery switch is in the “both” position, it will primarily draw power from shore power. However, if shore power is interrupted, the water pump will automatically switch to the house batteries, assuming they have sufficient charge.
Battery Switch and Battery Life and Charging Efficiency
Proper use of the battery switch significantly impacts battery lifespan and charging efficiency. Leaving the switch in the “both” position while connected to shore power allows the converter to efficiently charge the batteries. Conversely, leaving the switch in the “battery” position when shore power is available prevents the batteries from charging, which can lead to premature aging and reduced capacity.
Similarly, leaving the switch in the “battery” position when not in use will drain the batteries, shortening their lifespan. For example, a constantly-drained battery may only last for a couple of years, while one properly managed with a battery switch and shore power could last for five years or more.
Battery Switch and Energy Conservation in a Travel Trailer
The battery switch plays a crucial role in conserving energy. By turning the switch to the “off” position when not using the trailer, you completely disconnect the house batteries from the trailer’s electrical system, preventing parasitic drain (a slow, continuous discharge from even small devices). This parasitic drain, if left unchecked, can significantly reduce battery life and lead to a dead battery.
In addition, strategically using the “battery” and “both” positions ensures that you’re using the most efficient power source at any given time, maximizing the use of your shore power connection and conserving battery power for off-grid use. For instance, if you are parked at a campsite with shore power, utilizing the “both” position ensures your appliances run on shore power, preserving battery charge for later use.
Mastering your travel trailer’s battery switch is a game-changer for RV life. By understanding its function, performing routine maintenance, and knowing how to troubleshoot common issues, you’ll ensure reliable power for all your onboard systems. Remember safety first – always disconnect batteries before working on the switch. With a little know-how, you can keep your RV’s electrical system humming along, leaving you free to enjoy the open road!
FAQ Overview
What happens if I leave my battery switch in the “both” position all the time?
Leaving the switch in “both” constantly can drain your vehicle battery if the house battery isn’t fully charged. It’s best to switch to “house” when parked and “off” when not using the trailer.
How often should I clean my battery switch?
Inspect and clean your battery switch at least once a year, or more often if exposed to the elements. Use a wire brush to remove corrosion.
My battery switch is completely dead. What should I do?
Check your fuses first! If those are fine, it’s time to test the switch itself. If it’s faulty, replacement is necessary. Consult a professional if you’re unsure.
Can I use any type of battery switch in my travel trailer?
No. Choose a switch rated for the amperage of your batteries and electrical system. Incorrect amperage can lead to overheating and fire hazards.
